Cell Styles
Overview
SlapKit.Excel offers a wide array of formatting capabilities, enabling you to tailor the appearance of cells with options like number formatting, font properties, border styles, color schemes, text alignment and orientation. These customizations can be applied not just to individual cells, but across entire cell ranges for cohesive and impactful visual presentations.
Predefined Styles
To ensure consistency in your documents, you can utilize predefined styles. This API enables you to create custom cell styles or utilize built-in ones. You have the ability to modify all predefined cell styles, rename or delete any custom styles, and hide built-in ones as needed.
using XLWorkbook workbook = new XLWorkbook();
IXLWorksheet worksheet = workbook.AddWorksheet();

worksheet.Cell("A1").SetValue("Resolved issues")
    .CellRight().SetValue(250);
worksheet.Cell("A2").SetValue("Created issues")
    .CellRight().SetValue(45);
worksheet.Column(1).AdjustToContents();

//To access all the built-in cell styles, we can utilize the XLBuiltInStyleType enum.
IXLBuiltInPredefinedStyle styleBad = workbook.PredefinedStyles[XLBuiltInStyleType.Bad];

//You can create your own custom styles.
IXLCustomPredefinedStyle styleGood = workbook.PredefinedStyles["my style"];

//You can rename the custom predefined styles.
styleGood.Name = "Good - 2";

//You can customize the custom styles according to your preferences.
styleGood
    .Fill.SetBackgroundColor(XLColor.Green)
    .Font.SetFontColor(XLColor.White)
    .Font.SetBold();

//You can customize the built-in styles according to your preferences.
styleBad
    .Fill.SetBackgroundColor(XLColor.Red)
    .Font.SetFontColor(XLColor.White)
    .Font.SetBold();

//It is possible to hide built-in styles.
workbook.PredefinedStyles[XLBuiltInStyleType.Good].Hide();

//It is possible to delete custom styles.
IXLCustomPredefinedStyle styleToDelete = workbook.PredefinedStyles["style 1"];
styleToDelete.Delete();

//Let's apply the "Good" style to the "Resolved issues".
worksheet.Cell("B1").Style = styleGood;
//Let's apply the "Bad" style to the "Created issues".
worksheet.Cell("B2").Style = styleBad;

workbook.SaveAs("document.xlsx");
You can copy from existing styles.
using XLWorkbook workbook = new XLWorkbook();
IXLWorksheet worksheet = workbook.AddWorksheet();

worksheet.Cell("A1").Style.Fill.BackgroundColor = XLColor.Gray;

//You can copy from another predefined cell style.
workbook.PredefinedStyles["style-1"].CopyFrom(workbook.PredefinedStyles[XLBuiltInStyleType.Accent1]);

//You can copy styles from other objects that implement the IXLStyle interface, such as Cell, Row, Column, etc.
workbook.PredefinedStyles["style-2"].CopyFrom(worksheet.Cell("A1").Style);

worksheet.Cell("C1").Style = workbook.PredefinedStyles["style-1"];
worksheet.Cell("C2").Style = workbook.PredefinedStyles["style-2"];

workbook.SaveAs("document.xlsx");
By default, all cells use the "Normal" built-in style unless another style is assigned. Changing the "Normal" style affects all cells using it.
using XLWorkbook workbook = new XLWorkbook();
IXLWorksheet worksheet = workbook.AddWorksheet();

worksheet.Range("A1:C3").SetValue("Test");

worksheet.Cell("A1").Style = workbook.PredefinedStyles[XLBuiltInStyleType.Bad];
worksheet.Cell("B1").Style.Font.SetBold();

/*  All cells, excluding "A1" and "B1", will be affected.
 *
 *  - "A1" will not be affected because it's not utilizing the "Normal" style.
 *  - Changes to the Font property will not affect "B1" due to the modified Font property, but other changes such as Fill will affect it.
 */
workbook.PredefinedStyles[XLBuiltInStyleType.Normal]
    .Font.SetBold()
    .Font.SetItalic()
    .Font.SetFontColor(XLColor.Green)
    .Fill.SetBackgroundColor(XLColor.LightGray);

workbook.SaveAs("document.xlsx");
To prevent certain styling properties from taking effect, you can disable them.
using XLWorkbook workbook = new XLWorkbook();
IXLWorksheet worksheet = workbook.AddWorksheet();

IXLPredefinedStyle styleBad = workbook.PredefinedStyles[XLBuiltInStyleType.Bad];

//Disable fill
styleBad.ApplyFill = false;

worksheet.Range("A1:C3")
    .SetValue("Test")
    .Style = styleBad;

workbook.SaveAs("document.xlsx");
Style Properties
The IXLStyle interface provides style properties for various objects, including Predefined Styles, Cell Styles, Row Styles, and Column Styles. These properties allow you to customize the formatting and appearance of your spreadsheet.
Alignment
To alter the visual presentation of data in a cell or a range of cells, you have the options to adjust the text angle for a unique orientation or modify the text alignment for better positioning.
Horizontal Alignment
You can align text horizontally using the Alignment.SetHorizontal method or by setting the Alignment.Horizontal property. Choose from one of the following values for alignment:
- General: Default setting where text aligns left and numbers align right.
- Left: Text aligns to the left side of the cell.
- Center: Text is centered evenly between the left and right sides of the cell.
- CenterContinuous: Centers text across a selected range of cells, merging the visual space without actually merging the cells.
- Right: Text aligns to the right side of the cell.
- Justify: Adjusts word spacing so text fits the cell width, aligning evenly along both margins.
- Fill: Repeats the text in the cell to fill its width.
- Distributed: Spreads the text evenly across the width of the cell, including spacing between characters.
using XLWorkbook workbook = new XLWorkbook();
IXLWorksheet worksheet = workbook.AddWorksheet();

IXLCell cell = worksheet.Cell("A1");
cell.Value = "A1";
cell.Style
    // Align the cell content to the left according to the horizontal axis
    .Alignment.SetHorizontal(XLAlignmentHorizontalValues.Left)
    // Add space before the text in a cell, shifting it away from the cell border
    .Alignment.SetIndent(2);

IXLRange range = worksheet.Range("A2:C2");
range.FirstCell().Value = "A2";
range.Style
    // Center the text across the range, merging the visual space without actually merging the cells
    .Alignment.SetHorizontal(XLAlignmentHorizontalValues.CenterContinuous);

workbook.SaveAs("document.xlsx");
Vertical Alignment
Vertical alignment refers to the positioning of text within a cell along the vertical axis. You can apply vertical alignment by taking advantage of the Alignment.SetVertical method or the Alignment.Vertical property. You can set one of the following values:
- Top: Positions text at the top of the cell.
- Center: Centers text vertically within the cell.
- Bottom: Aligns text to the bottom of the cell.
- Justify: Stretches the text evenly across the cell height, spacing it from top to bottom.
- Distributed: Similar to justify, but adds equal spacing above and below each line of text.
using XLWorkbook workbook = new XLWorkbook();
IXLWorksheet worksheet = workbook.AddWorksheet();

IXLCell cell = worksheet.Cell("A1");
cell.Value = "A1";
cell.Style
    // Align cell content vertically to the top of the cell
    .Alignment.SetVertical(XLAlignmentVerticalValues.Top);

workbook.SaveAs("document.xlsx");
Wrap Text
The "Wrap Text" feature is a formatting capability used to manage how text fits within a cell. When "Wrap Text" is enabled, instead of continuing text in a single line or overflowing into adjacent cells, the text automatically wraps within the cell. This means the text will move to a new line within the same cell, expanding the cell’s height to accommodate the wrapped text. To enable or disable "Wrap Text", the Alignment.SetWrapText method or the Alignment.WrapText property can be used.
using XLWorkbook workbook = new XLWorkbook();
IXLWorksheet worksheet = workbook.AddWorksheet();

IXLCell cell = worksheet.Cell("A1");
cell.Value = "A1";
cell.Style
    // Enable wrap text for the cell
    .Alignment.SetWrapText(true);

workbook.SaveAs("document.xlsx");
Shrink to Fit
The "Shrink to Fit" feature is designed to adjust the font size within a cell so that the text fits within its current column width. This feature is particularly useful for ensuring that all the text in a cell is visible without the need to manually adjust the font size or column width. To toggle the "Shrink to Fit" feature, you can utilize either the Alignment.SetShrinkToFit method or set the Alignment.ShrinkToFit property accordingly.
using XLWorkbook workbook = new XLWorkbook();
IXLWorksheet worksheet = workbook.AddWorksheet();

IXLCell cell = worksheet.Cell("A1");
cell.Value = "A1";
cell.Style
    // Enable shrink to fit for the cell
    .Alignment.SetShrinkToFit(true);

workbook.SaveAs("document.xlsx");
Orientation
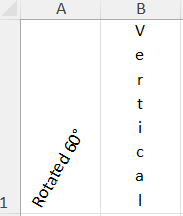
The Orientation feature allows you to adjust the angle at which text is displayed in a cell. This feature is particularly useful for customizing the layout of your spreadsheet, making it more readable or fitting more text into a smaller space.
In SlapKit.Excel, you can adjust text orientation using the Alignment.SetTextRotation method or the Alignment.TextRotation property. These accept values ranging from -90 to 90 degrees, representing the desired rotation angle. For vertical text positioning, simply set the value to 255.
using XLWorkbook workbook = new XLWorkbook();
IXLWorksheet worksheet = workbook.AddWorksheet();

IXLCell a1 = worksheet.Cell("A1");
a1.Value = "Rotated 60°";
a1.Style
    // Rotate the cell content with angle of 60 degrees
    .Alignment.SetTextRotation(60);

IXLCell b1 = worksheet.Cell("B1");
b1.Value = "Vertical";
b1.Style
    // Position the cell content vertically
    .Alignment.SetTextRotation(255);

workbook.SaveAs("document.xlsx");
Font Properties
You can customize the text appearance into a spreadsheet by adjusting the various font options, such as font family, font size, and color.
using XLWorkbook workbook = new XLWorkbook();
IXLWorksheet worksheet = workbook.AddWorksheet();

IXLCell cell = worksheet.Cell("A1");
cell.Value = "Font Properties";
cell.Style
    // Apply font properties
    .Font.SetFontName("Carlito")
    .Font.SetFontSize(10)
    .Font.SetFontColor(XLColor.BlueViolet);

workbook.SaveAs("document.xlsx");
Font Style
To customize the font style the Font.SetBold and Font.SetItalic methods can be used.
using XLWorkbook workbook = new XLWorkbook();
IXLWorksheet worksheet = workbook.AddWorksheet();

IXLCell bold = worksheet.Cell("A1");
bold.Value = "Bold";
bold.Style.Font.SetBold(true);

IXLCell italic = worksheet.Cell("A2");
italic.Value = "Italic";
italic.Style.Font.SetItalic(true);

IXLCell boldItalic = worksheet.Cell("A3");
boldItalic.Value = "Bold Italic";
boldItalic.Style
    .Font.SetBold(true)
    .Font.SetItalic(true);

workbook.SaveAs("document.xlsx");
Text Decoration
To apply a strikethrough to text, utilize the Font.SetStrikethrough method.
For underlining text, employ the Font.SetUnderline method, selecting from one of the following values:
- None: No underline is specified. This is the default behavior.
- Single: One of the most common styles, it places a single line under the text.
- Double: Adds two parallel lines under the text, often used for financial statements or to denote total figures.
- SingleAccounting: Similar to the single underline but aligns the underline with the width of the cell, rather than the text length.
- DoubleAccounting: Like the double underline, but extends across the entire cell.
using XLWorkbook workbook = new XLWorkbook();
IXLWorksheet worksheet = workbook.AddWorksheet();

IXLCell strikethrough = worksheet.Cell("A1");
strikethrough.Value = "Strikethrough";
strikethrough.Style.Font.SetStrikethrough(true);

IXLCell underline = worksheet.Cell("A2");
underline.Value = "Underline";
underline.Style.Font.SetUnderline(XLFontUnderlineValues.Single);

workbook.SaveAs("document.xlsx");
More Text Effects
To add superscript or subscript formatting to your text, make use of the Font.SetVerticalAlignment method.
using XLWorkbook workbook = new XLWorkbook();
IXLWorksheet worksheet = workbook.AddWorksheet();

IXLCell a1 = worksheet.Cell("A1");
a1.Value = "Superscript";
a1.Style.Font.SetVerticalAlignment(XLFontVerticalTextAlignmentValues.Superscript);

IXLCell b1 = worksheet.Cell("B1");
b1.Value = "Subscript";
b1.Style.Font.SetVerticalAlignment(XLFontVerticalTextAlignmentValues.Subscript);

IXLCell c1 = worksheet.Cell("C1");
c1.Value = "Baseline";
c1.Style.Font.SetVerticalAlignment(XLFontVerticalTextAlignmentValues.Baseline);

workbook.SaveAs("document.xlsx");
Border Styles
Applying border styles, colors, and visibility is straightforward and customizable. Utilize the XLBorderStyleValues enumeration to select a border style from one of the following values:
- None: No border. Used to remove any existing borders from a cell or range.
- DashDot: This style consists of a line made up of dashes and dots alternating.
- DashDotDot: Similar to DashDot, but with two dots between each dash.
- Dashed: A border comprising a series of short dashes, creating a broken line effect.
- Dotted: This style features a border made up of closely spaced dots, giving a less continuous and lighter appearance than solid lines.
- Double: A border that has two parallel lines, often used to emphasize or denote importance, such as in financial statements.
- Hair: This is a very fine and delicate line, thinner than the Thin style, resembling a hairline.
- Medium: A border that’s thicker than the Thin style but not as bold as the Thick style. It strikes a balance between being prominent yet not too overpowering.
- MediumDashDot: A border that’s of medium thickness, made up of dashes and dots.
- MediumDashDotDot: A medium-thickness border consisting of a pattern of dash followed by two dots.
- MediumDashed: A dashed line of medium thickness.
- SlantDashDot: A unique style featuring a slanted dashed line alternating with dots.
- Thick: A bold and wide border, used to make a strong visual statement.
- Thin: A standard, fine line border, great for subtle cell delineation without heavy emphasis.
using XLWorkbook workbook = new XLWorkbook();
IXLWorksheet worksheet = workbook.AddWorksheet();

worksheet.Cell("B2").Style
    .Border.SetTopBorder(XLBorderStyleValues.Medium)
    .Border.SetRightBorder(XLBorderStyleValues.Medium)
    .Border.SetBottomBorder(XLBorderStyleValues.Medium)
    .Border.SetLeftBorder(XLBorderStyleValues.Medium)
    .Border.SetDiagonalBorder(XLBorderStyleValues.Thin)
    .Border.SetDiagonalBorderColor(XLColor.Red)
    .Border.SetDiagonalUp(true)
    .Border.SetDiagonalDown(true);

workbook.SaveAs("document.xlsx");